Monday, January 30, 2017

New Becca Soft Light Blurring Powder- Swatch and First Impression


When I was at Sephora the other day I took a look at the new Becca Soft Light Blurring Powder that is out for spring. It's $38 USD or $46 CND, and it's a powder that is supposed to be a universally flattering shade named Golden Hour. The powder is supposed to blur imperfections, eliminate shine, add extra dimension to the face, and add a subtle radiance. It sounds counterintuitive to have it both eliminate shine and add it, but I suppose it's possible.


The packaging on this powder is huge. I have small hands, but I did find this slightly difficult to get a grip around. It's a large transparent plastic rectangle with a slightly odd opening mechanism for the lid. You turn it side-ways than pull up, if you continue to turn it it will close again.
The powder is a peach-gold colour that is finely milled and is dispensed through a sifter. It felt light-weight when I swatched it.
Left bare skin, Right swatched Golden Hour Soft Light Blurring Powder
On the skin the orange tint to the powder goes away leaving instead a lovely light gold. In the swatch above I layered the product a couple times so it could be seen in a photograph, but I think it could be lightly applied for an all-over glow. Just keep in mind it will be glowy- this definetly isn't as satin as their glow metre depicted on the display indicates. 

I think this product might be good if you're looking for a loose all-over glow or a less intense highlight shade. In purpose it reminded me of the Hourglass Ambient Lighting Powders- though I don't know how it would perform in comparison. For me personally I liked the powder but I don't know if I'd like it all over my face- I might have to try that sometime to see if it really does blur imperfections, and to see how much glow it actually imparts there versus what my hand showed. 

Have you tried this product? What do you think? Does it both eliminate shine and add radiance? Let me know! :)

Disclaimer: The widget at the top contains an affiliate link, and brings you to the page on Sephora. I get a whole 5 cents if you click it. Mainly though the picture is there so you can see a professional shot of the product.

Sunday, January 29, 2017

Anastasia Beverly Hills- Matte eyeshadow swatches

When I was asking around about people's favourite matte eyeshadow formula, Anastasia Beverly Hills was one that was brought up again and again. And I've never tried them! So I decided I needed to rectify this immediately and went off to swatch and play with these at Sephora.

Each shade below was on my bare skin, with the pigment built up on my finger than swatched in the same spot twice.

L-R: Baby Cakes, Buon Fresco, Stone, Fawn, Ash Brown, Burnt Orange
L-R: Burnt Orange, Sienna, Noir, Custard, Warm Taupe, Caramel, Hot Chocolate, Smoke
L-R: Dusty Rose, Fresh, Birkin, Blazing, Orange Soda, Red Earth
Overall they are pretty impressive. Some of the shades swatched better than others (generally the darker shades were better than the lighter ones). Blazing in particular had fantastic pigmentation, as did Burnt Orange, Hot Chocolate and Smoke. Noir the matte black I'd pass on as it wasn't that great in terms of pigmentation and creamy texture.

The only shade they didn't have from the matte shades was deep plum, the whole tester was missing, making me think someone likely swiped it. I did include Dusty Rose in the swatches even though it's labeled a velvet because it didn't have any of the sheen of the other velvet shades- it looks matte to me.

Do you have any of the Anastasia Beverly Hills eyeshadows? Any favourites from the line?

Disclaimer: The widget link at the top is an affiliated link. I get five whole cents if you click it. Mainly I'm using it for the nice professional photo.

Interested in seeing more swatches from Anastasia Beverly Hills? You can see the Duochromes from the singles swatched here.

Anastasia Beverly Hills- Duo-chrome Single Eyeshadows Swatches


This is the second group of swatches from Anastasia Beverly Hills single eyeshadow line. Previously I swatched all the matte shades from the singles in the permanent line, you can see that post here. Today is the smallest group of swatches, the four duo-chrome shades.
L-R: Electro, Iridescent Purple, China Rose, Dragonfly
The four duo-chrome shades are Electro a light cool-pink with purple reflect, Iridescent Purple a medium to dark cool purple with a slightly lighter purple sheen, China Rose a gorgeous copper-pink with light orange reflect, and Dragonfly a blue teal with green-teal reflect. Of the four shades China Rose was the most pigmented and rich. Electro also had good pigmentation and both Iridescent Purple and Dragonfly needed to be built up more.

L-R: Dragonfly, Iridescent Purple, Electro, China Rose
Here are the four shades watched on my fingertips, to give  a better idea of the duo-chrome each shade has. 

Of the four I would highly recommend China Rose, it went on really well in the swatch and had such great pigmentation. None of the shades are ones that are truly unique in the cruelty-free market, (Urban Decay comes to mind. If anyone is interested I can do comparisons at some point) but all are nice shades.

Do you have any ABH eyeshadows? Any favourites?

Disclaimer: The widget link at the top is an affiliate link. I get a whole 5 cents if you click it. Mainly it's there so you can see the Dragonfly eyeshadow professionally photographed.

Friday, January 27, 2017

Jaydancin Mineral Foundation- Review


Today's review is for a Mineral Foundation by a small Canadian company called Jaydancin. They're a skincare and make-up brand that focus on all natural and organic ingredients. Plus, they're a local brand for me which is really cool.

As you can see from the picture, the foundation is a loose powder. I have the foundation in shade 1 and they have quite a few foundation shades, though only five are available through their website. They have two sizes available the larger at 9 grams for $18 CND, and the smaller 3 grams for $10 CND. Pictured above is the 3 gram size.

Ingredients: Rice Powder, Titanium Dioxide, Zinc Oxide, Kaolin Clay, Iron Oxides

I do really like the ingredients in this foundation. Both Titanium and Zinc oxide give a bit of sun protection and the Kaolin clay is good for oil absorption. 

The foundation is what I would call sheer coverage- it doesn't cover anything major but it evens out your skin-tone a bit and still looks like skin. It does fairly well on my oily skin through-out the day, needing to be re-touched in the afternoon. 
Bare Face
With Jaydancin Foundation (nothing else)
As you can see if you've got skin issues (acne, post-acne marks, etc) to cover like me this isn't going to cut it on it's own, but with some concealer it looks nice. It's very natural looking and can easily pass for a no make-up look. 

The packaging is a tad small (3 gram) to work with but I do like the shifter that comes with it. It's very easy to move and you can actually get a decent amount of powder out without spilling it all. It's a nice change from sifters that don't let enough out or having to deal with all the powder at once.

Overall as long as you go into it knowing that the foundation is sheer it's a nice foundation. It blends in well and stays all day, even if you do need something extra for oil control part way through. 

Sprite Rating: 8/10, mainly because it doesn't have enough coverage for me and sometimes the loose powder is a bit hard to work with in the size of the 3 gram packaging. 


Wednesday, January 25, 2017

DIY: Mineral Highlighter


This is a tutorial on how to make your own highlighter. It's the second of my DIY tutorial posts.

First you'll need some supplies. I purchased most of mine from TKB Trading or How to Make Cosmetics (they're both the same website). I like them because everything is fairly priced, they always have a small 'freebie' pack you can include in your order and you can purchase sample sizes of everything to try (which is often more than enough for a couple individual projects). (To add the freebie set, type free into the search bar and add the product to your cart).

What you'll absolutely need:
Recommended things:
Why these ingredients? Let me break it down.

Travel to Neptune or any highlight and shift is to provide the actual highlight and colouration to your finished product. Travel to Neptune is a blue to green shift which is the ethereal look I'm going for, but choose one that makes you happy. You can also use one of their Hi-Lite pigments which only flash one shade for example gold, or purple. The Hi-lite pigments are cheaper and work, but I love the look of the travel to pigments for more unique colours. This ingredient is going to be the majority of our highlighter so that you get excellent pigmentation.

For the base (or the parts that make the highlighter stick to your skin and last for a while)...

Boron Nitride is a white powder. It improves the 'slip' or creaminess of a product making it apply better (less patchy). Boron Nitride also helps with the adhesion- basically it increases the lasting power of the highlighter on your skin- so you get hours of wear instead of minutes.

Silica Microspheres are a translucent powder that does many things for the formula. They are slightly oil absorbent so they're great for my oily skin. They also increase the 'slip' of a powder. Silica spheres are light reflectors, and so will reduce the look of pores and wrinkles slightly too.

Magnesium Myristate is another soft translucent white powder. This product improves adhesion, slip, pressability (meaning if you are going to press this into a pan later it will work better), as well as helping to make the ingredients meld together better. Basically it helps the ingredients become one final product instead of just mixed together powders.

Kaolin Clay is white again, and another great oil absorber and thus a great choice if you have oily skin. It also helps with adhesion to the skin.

Allantoin is a skin protectant. It soothes the skin and you only need the smallest amount to make a difference. 

Now for the recipe, I broke this down into 20 scoops total with my tiny 0.1 gram scoop. This creates enough to fill a 36 mm pan about half-way when pressed. I don't recommend using a grinder on anything other than the Magnesium Myristate, Kaolin Clay or Allantoin as the others can be damaged if you grind them and won't feel right or possibly perform incorrectly.

Travel to Neptune pigment: 50% or 10 scoops
Boron Nitride: 20% or 4 scoops
Silica Microspheres: 20% or 4 scoops
Magnesium Myristate: 5% or 1 scoop
Kaolin Clay: ~ 4% or 3/4 scoop
Allantoin: ~1% or 1/4 scoop


1. Take your sieve and place it over your bowl. Place on your dust mask to avoid breathing in the powders. Measure out each amount of ingredient and empty through the sieve into the bowl. The sieve will make sure there are no clumps and make it easier to get an even mix.

2. Mix all the ingredients together with your small scoop.

3. Move the mixed ingredients into a small ziplock baggie. Squeeze, shake and move the baggie so that the ingredients are throughly and completely mixed. You can also use a clear small jar to do this if you want to keep the highlighter loose.

4. Optionally you can press the highlighter with just oil (i.e. jojoba oil) into a pan. I've not tried it with alcohol so I can't recommend that method. (See my tutorial on how to press powders: here)

5. Try it out! It should be smooth and pigmented. :) I have oily skin and I got hours worth of wear out of it. It was fairly easy to build up in pigmentation too.

The nice thing about making your own highlighter is you can specify exactly what you want it to look like and it's cheaper. You'll make a ton of product just with what is available in the sample bags purchased. For example the powders used in the recipe from TKB cost a total of $10.25 USD for the six sample size packages of the powders. If you use all of your travel to neptune pigment to create highlighter you can create a total of 5 grams of highlighter. If you use a Hi-Lite powder from TKB trading instead of one of the more expensive travel to pigments you can create a total of 12 grams of highlighter for $10.25 USD. A similar highlighter from NYX is $8 USD for 6 grams or the Make Up Geek one for $20 USD for 7 grams.

Well that's it! Let me know if this works for you if you decide to do it, I'd love to know how my recipe works for people other than myself. Also feel free to ask any questions. If you share the recipe please link and credit back to me- I worked hard to come up with the right percentages and ingredients. Until next time.

Disclaimer: I purchased all these products myself. At this time I'm not affiliated with any of the companies shown or mentioned.
SaveSaveSaveSaveSaveSave

Tuesday, January 24, 2017

DIY: Pressing Powders


This is hopefully the first of a series of posts on DIY cosmetics. I want to take simple projects that are fun to do and give good results, and provide you with small tutorials on how to achieve them.

Today I'm showing how to press loose powders of any type, be they matte, shiny, face or otherwise. The trick to this is not to use alcohol. Normally alcohol is recommended as it evaporates and makes it easier to get a perfect pressed shadow. Alcohol however reacts badly to certain types of powders, matte eyeshadows in particular. This post explains how to press a powder (in this case a highlighter for the face) without the use of alcohol. Alcohol is sometimes useful for pressing eyeshadows made of only mica, however if you don't know the ingredients or have eyeshadows that have iron oxides, ultramarine pigments, or other matte colourants then you need to not use alcohol or the shadow will turn into a hard rock that doesn't give any colour pay-off.

I purchased all of my supplies from TKB Trading or How to Make Cosmetics (except for the Jojoba oil). They're the same website, and I like how you can get small amounts to try for decent prices. The Jojoba Oil I got from a health food store.

Ingredients:
First you'll need a stable oil. I chose Jojoba because it has a long shelf-life and only rates a 2 out of 5 on the comedogenic scale. Coconut oil is also popular but it causes me to break-out so I used Jojoba. If you choose an oil that has a lower shelf life beware that the oil will go rancid over time as it reacts with oxygen.

Another thing to keep in mind is that liquids can provide a perfect environment for mould. This is why you see a preservative pictured and listed in the needed items. You need hardly any, and the one I chose Cap-5 is safe for all cosmetic applications. It's paraben-free and formaldehyde-free.

With the powder or eyeshadow you're pressing try to use formulated powders that have a base. Base powders help the eyeshadow stick together and adhere to your skin for better staying power. Loose pigments on their own will press but they likely won't preform well. So in the ingredients of the shadow or powder your pressing look for things like Boron Nitride, Magnesium Myristate, Zinc Stearate, etc. Most reputable indie companies will have this in their eyeshadows already.

1. Mixing the oil and preservative
The first thing to do is mix the preservative together with the oil you plan to press with. Preservative Cap-5 is recommended at 0.1-0.2% in pressed powders and at 0.5-1.5% in liquid. You only need the smallest amount and I like to do this by counting the number of drops of liquid. So you need 1 drop of preservative to 99 drops of Jojoba oil for 1%. I recommend putting this into a small plastic jar and then tightening the lid and shaking to mix the two together after you finish counting.
A little too much powder! Had to empty some so I didn't spill.

2. Take the Loose Powder and Add Oil
Next take the loose powder you are pressing and add an amount to the small bowl or empty loose powder container you're using. Take the oil/preservative mix and slowly add drops to the powder. Use your little scoop to carefully and evenly mix together.

3. When Chunky Move to the Pan
You're looking for a texture that's almost chunky. Where the powder is starting to stick together in flakes and bits. (Just make sure they're fully mixed and not dry on the inside). Take this mixture and spread into the pan.

4. Press!
Now take your pressing tool and some paper towel. Place the paper towel over the whole pan and slot the pressing tile on the bottom of the tool into the top of the pan through the paper towel. Make sure you have it lined up properly. If you buy the tool from the same place as the pans you should have a perfect fit. If not make sure you purchase the same millimetre diameter tool and pans. Press down firmly and evenly (I recommend standing for this and bearing down from above).

5. Ta Dah!
When you life the paper towel you should have a pressed pan. Like mine it may not be the prettiest in the world but that comes with practise. As you can see mine only fills the pan part way. You can leave it like this or add more powder/oil mixture on top and press again to fill it. You can also press a couple of times with new paper towel each time to get more of the oil out of the powder. If you've got the correct consistency of pigment/ oil and pressed it properly it should be sturdy enough not to shatter if you drop it from a small height. It won't be as solid as purchased pressed products but it shouldn't be super weak either.


Tricks and Tips:

  • Less is more! Do not over add the oil or you'll end up with a mess that won't ever dry out. Start off with way less oil than you'll need and slowly add more as needed.
  • When you think you have the consistency right the colour of the powder should all be the same (i.e. all wet, not sections or clumps that still look dry) 
  • When the consistency is right you should be able to press it together and it will stick together against the side of the jar (then just chop it back to bits again so you can spread it better into the pan)
  • Do small layers inside the pan and build up the pressed material. I.e. press some in the bottom of the pan, add another layer of powder and oil, press again etc. This makes for far less mess and spillage as well as a better pressed product
  • Feel free to press as many times as you like to get as much oil out of the eyeshadow as possible. You can't over-press, just remember to keep the pressure even when you press.

That's it! A fairly simple way to press pigments. I hope this comes in useful for you, if not feel free to ask questions. Please let me know if you like the idea of DIY tutorial posts.

Another helpful website for pressing matte eyeshadows is Lisa Lise Blog here, it gives a different perspective on the process if you're interested.

Disclaimer: I purchased all these products myself. I am in no way affiliated with TKB Trading at this time.
SaveSave

Monday, January 23, 2017

Silk Naturals- Haul and First Impressions


This is the first time I've purchased from Silk Naturals and I'm pretty excited about it. Silk Naturals is an all natural brand with well thought-out ingredient choices and lots of vegan options. It has both a wide selection of skin care and make-up for very reasonable prices. They also have samples of many of their products which is great if you just want to see if your skin reacts well or if you like a certain formula.

For skin care I decided to try a sample of their 8% Lactic Acid AHA toner, and I got my mom a sample of their Facelift serum.

Make-up wise, I purchased two lip products- one in their Velvet Matte Lipstick formula- Garter, and the other in their Kisser Slicker formula, Asset. For eyeshadow I got their Howl eyeshadow- a light lilac with blue shift, as well as a sample of their Ozone shadow and a gift with purchase shadow called Desire. I also decided to try a couple of their Perfecting Glow powders which I got in sample sizes of Close-up and Liberty. I also bought a sample size of their Oil Control Primer Powder (missing from top picture).


Garter, is a lipstick in the Velvet Matte Lipstick formula, and a lovely my lips but better light mauve shade. The Velvet Matte Lipstick is a nice cushiony formula, with opaque coverage. I personally wouldn't qualify it as a matte lipstick, except that it does hang around for longer than something that feels this nice usually does. From what I've seen so far it isn't transfer-proof but I like the one I purchased and would be interested in trying more from the formula.

Top: Asset, Bottom: Garter
Asset is from the Kisser Slicker line, a sort-of balm and a lip-gloss together. It's a sheer juicy berry shade that I'm really digging. It's what I wished Black Honey from Clinique had looked like, so I'm really pleased. I'm planning on using it in an upcoming look. I haven't tried this one out as much but I do like the formula even though it doesn't last as long as the Velvet Matte Lipstick does.


                                                                               The Oil Control Primer Powder is a white powder than when dusted on goes transparent. The two times I tried I didn't find that it helped all that much with oil control, but I do have very oily skin. I'll keep experimenting with it but so far I'm not sure I'll repurchase.

Clockwise from far left: Ozone, Howl, Liberty, Dearest, Close-Up
L-R: Close-Up over primer, Close-Up blended, Liberty over primer, Liberty blended
The Perfecting Glow powders I've not been able to give a proper try yet, but I'm pretty excited to try them out. I'm hoping they'll give a similar effect to the Hourglass Ambient Lighting Powders. Liberty is a gold with the smallest sparks of shimmer. Close-up is a white-tan/gold with more of a sheen than a sparkle. I'll be doing a review on these two once I get the chance to play with them a bit.

Ozone eyeshadow
L-R: Howl, Dearest eyeshadows
I received three eyeshadows, one I purchased, one gift with purchase because I spent over $10 USD, and one free sample that comes with every order. Ozone was a surprise, as in the bag it doesn't look like much but watched it's a rose-brown with strong blue reflect. Howl is a very light fairly sheer lilac with a blue shift. Lastly is Dearest a matte rose-brown (a tad rosier in real life than the picture). I'm now interested in more of their matte shades.


I haven't had long enough to really see results from the skin care but the AHA Toner is 8% Lactic acid and only has a very slight smell to it. It's liquid like water and I don't get any stinging when I apply it. The Facelift Serum is slightly more gel-like in texture. I've given it to my mother so I'll hear back from her on the results.

That's it, what do you think? I'm for sure going to be purchasing from Silk Naturals again. Have you purchased from Silk Naturals before? I'm excited to test drive these some more, let me know if you want something reviewed further.

Disclaimer: I purchased all these products myself, except for the gift with purchase and sample eyeshadows that everyone receives when they order over a certain amount.

Friday, January 20, 2017

Nars Velvet Matte Lip Pencil in Cruella, Review & Swatches


Today I'm reviewing the Nars Velvet Matte Lip Pencil in Cruella. This is a popular formula from Nars and now upon trying it I can see why. I'm kicking myself for not trying them sooner.

It comes in a standard pencil format meaning you have to sharpen it in order to get to more product. I personally love twist up pencils so the packaging is a bit of a miss for me. There is 0.5 g or 0.01 oz of product in the full-size pencil for $33 CND or $27 USD.

The formula itself is fantastic. It is matte but I'd say it's one of the best matte formulas I've tried. It stays matte and doesn't smear easily but it will transfer. It won't bleed into lipliner either. The Velvet Matte Lip Pencils are still fairly comfortable on too, unlike the way I find most liquid matte lipsticks that dry down these days. The colour glides on smoothly and it's richly pigmented. And best of all it's long lasting. So long lasting it made it through a dinner of soup and four hours of wear until I had another snack.

As for the colour itself, Cruella is a beautiful blue-based almost neutral red. It's so gorgeous on for me, a statement but not so loud that it's too much. I love the depth of the colour too. It's just so classy. 

Have you tried the Nars Velvet Matte Lip Pencil formula?

Ingredients: c12 13 Alkyl Ethylhexanoate, Candelilla Cera (Euphorbia Cerifera Wax), Polyethylene, Cyclomethicone, Phenyltrimethicone, Silica, Dimethicone, Sucrose Acetate Isobutyate, Hydrogenated Coco Glycerides, Di Calcium Phosphate, Quaternium 18 Hectorite, Propylene Carbonate, Propylparaben, Methylparaben, Aroma (Flavor), Lecithin, Tocopherol, Ascorbyl Palmitate, Citric Acid, May Contain ( /-): Mica, Iron Oxides (CI 77491, 77492, 77499), Yellow 6 Lake (CI 15985), Blue 1 Lake (CI 42090), Manganese Violet (CI 77742), Yellow 5 Lake (CI 19140), Red 30 (CI 73360), Yellow 10 Lake (CI 47005), Red 6, Red 7 Lake (CI 15850), Red 28 Lake (CI 45410), Red 22 Lake (CI 45380), Carmine (CI 75470), Titanium Dioxide (CI 77891), Bismuth Oxychloride (CI 77163)

Sprite Rating: 9/10

Could be less expensive, and a tad less dry, but otherwise it's a great formula, and it really lasts a long time.

Disclaimer: The widget at the top of the page is an affiliated link. I get five whole cents if you click it, but mainly it's there for the professional photograph done by the company. I received this lip pencil as part of Sephora's Beauty Insider Program for my birthday. The Beauty Insider Program is free for anyone to join.

Monday, January 16, 2017

Disappointing Product: Nars Blush in Sin


Despite Nars Sin blush being a favourite of many, I have to say this blush is a huge disappointment for me. At $38 CND Nars blushes are pricy and because I lost it for I time I can't return it either.

Nars Sin swatched
The thing about this blush is that it sounds like it would be exactly what I'm looking for- a cool shade that has purple tones to go with my variety of cool toned looks that I don't want something warm-toned on the cheeks with. In fact Sephora describes this as a "berry with gold shimmer". Nars Sin is really pigmented, and the shimmer is minimal so it's should be more of a glow then a full on frosty shimmer. What isn't to like?

However, this blush just looks awful on me. Even used extremely lightly I look dirty and bruised. Like the bruise is in a stage of healing where there are multiple colours. For some reason the gold shimmer which is minimal highlights my cheek wrong and gives this multi-toned bruise effect. The shimmer didn't emphasize my pores any more than they already are noticeable, but that's about all the good I can say about it.
Nars Sin applied lightly
It's true I'm very pale, as pale as you can get and still have a yellow undertone to the skin. But I honestly didn't think this blush would clash as badly as it does with my face. This blush looks so bad I'm now wary of trying any more berry or cool toned blushes.

I do think this blush will look fine on other people, just maybe not someone quite as light as I am.

Do you have any cool toned blush recommendations for me? Do you have any products that work for others that majorly failed for you? Let me know! Until next time.

Hebridean Sprite

Disclaimer: The widget at the beginning is a affiliated link. I get five whole cents if you click it. Mainly I'm using it for the professional photo.

Sunday, January 15, 2017

Blue Face of the Day


I just wanted to show you my outfit and my make-up for today. I got this beautiful shirt and necklace both from my mother for Christmas and it's my first time wearing them.


Here are the products I used:

For eyes:
Hedgerow eye shadow by Scaredy Cat Cosmetics
Craving eyeshadow by Nyx
Brûlée eyeshadow by Wet n' Wild
Purple mascara from Blinc
Midnight Gel Liner by Mac (from when they were still cruelty-free. There are some other cruelty-free  options available now instead. Meow Cosmetics has one in blue called Oceanic. I plan on reviewing the purple eyeliner soon from that line).

For Face:
Becca Ultimate Coverage Cream Concealer in Banana
Jaydancin Mineral Foundation in shade 1
Laura Mercier blush in Rose Petal

For Lips:
Tarte Lip Crayon in Hope
Notoriously Morbid Changling topcoat in Siren

Hope you have a wonderful day!

Friday, January 13, 2017

Most Used Ecotools Brushes


Good brushes really do make all the difference when I'm applying my make-up. And I'm really quite particular about my brushes. They need to be super soft because I've got sensitive skin, they need to be shaped correctly for the purpose that I plan to use them for, they need to not shed when I use them or wash them and of course I want them to be cruelty-free.

Because of this my go to brand tends to be Ecotools. They're fairly easy to get ahold of here in Canada, they're reasonably priced, they're sturdy and the are completely cruelty-free with 100% synthetic bristles.

One of the nice things about synthetic bristles is that they don't hold bacteria as easily as natural hair brushes do. They still need to be washed of course, as any product build-up can harbour bacteria but it's still a bit of piece of mind for me at least- especially as I don't wash my brushes as much as I should!


My first set of brushes are mainly used for my face. Above is my retractable kabuki brush from Ecotools and the only brush I use to apply my powder foundation. I love this brush and use it just about every time I do my make-up. It's thick, soft, doesn't ever shed, spreads and buffs powder products well and on top of all that is perfect to travel with as it retracts into the metal case so that none of the bristles are at risk of being bent.


The next two brushes (the two left) are both from different Ecotools' sets and are both meant to be either blush brushes or all over face brushes. I use the smaller of the two (middle) exclusively for blush application and the right one for both loose finishing powder application and blush. They're a little different in shape from one another but both work well. I wouldn't buy them on their own but I'm glad they came with some of the other brushes in a kit. The nice thing about the kits is that they usually come with a travel bag for the brushes too.

The paddle foundation brush above (right) also gets a lot of use when I have a liquid foundation as this shape of brush is my preferred application method. It's thick enough that it blends the product well while small and flexible enough to get into the crease around my nose.


These next brushes I use entirely for eyeshadow application, even the brush on top which came advertised as a concealer brush. As you can tell I tend to use multiple ones at the same time so I don't muddy the eyeshadow colour I'm applying. These are easy to swipe clean on a kleenex between shades too, so I tend to use them nearly every time I apply eyeshadow. Some of these I received as part of a brush kit and some I purchased separately.


This brush again was part of a kit but I love how fluffy it is! Though tiny it's great for applying a setting powder to under-eye concealer or to blend out any harsh lines of a shadow. It's even good for applying a shadow lightly in the crease of the eye.


Please ignore the dent in this last one, it's been well loved. I adore my angled liner brush from Ecotools. It has long stiff bristles, and the slant is perfect. I use this to do fill my eyebrows with brow powder, put eyeshadow along the bottom lid of my eye, do detail work in the outer-v, and apply gel or powder eyeliner. Such a great brush.

So this is my rave about my Ecotools brushes. I love them as you can probably tell. I only wish they had a pencil brush I could use in my crease available as an individual brush, though I have seen some in the newer brush kits that are out.

You can get Ecotools at a variety of stores here in Canada, some of which include: Walmart, Rexall, London Drugs, Pharmasave, and they've been spotted in some Costco's. Online they're available through iHerb  as well.

In the USA they're avilable through Target and Walmart. I'm sure they're avilable at most standing stores as well, I just don't know which ones as I don't live there.

Remember if you order online to always check out retailmenot for coupon codes and use ebates at most major websites (like Target).

I hope you found this break down of some of my favourite Ecotools brushes useful! Take care until next time.


Disclaimer: All products in this post were purchased by me. The only affiliate link in the post is the ebates links.


SaveSave

Thursday, January 12, 2017

Hourglass Ambient Lighting Powder in Diffused Review


This is a review covering Hourglass' Ambient Lighting Powder in Diffused Light. I know just about everyone has reviewed these but I had been sighing over this for years and now I feel I have to add my voice to the chorus.

Close-up of the powder in Diffused
The ambient lighting powders are supposed to be finishing powders that mimic different lights upon your skin giving your complexion the best possible appearance. There are six in total in the main line (there are some in palettes that were limited edition or only available in the palette) each representing a different light. Diffused the one I have is the second palest of the collection, and a very pale yellow supposed to represent clean morning light.

What the powder is said to do is not only slightly combat redness due to the slight yellow tone, but also add a glow to the skin and blur imperfections including pores and fine lines.

The packaging is light-weight plastic but it looks more expensive with the lovely bronze mirrored shade and sturdy design. That said I've tried to be very careful in the handling of my powder as it comes with a warning that the powder itself is fragile- which for me makes this something I won't be traveling with.


Hourglass description of the powder along with the ingredients list
In Canada these powders retail for $55 CND, and don't include a brush. The brush is sold separately and although it looks lovely I couldn't justify another $45 CND on a brush just for a powder. 


When I use this powder I actually find that I prefer to use this with a puff, rather than a brush. Personally I find that this gives the most product per area on my face but it easily can be used with a brush too if that is your preference for a less glowy look. One thing to make note of though is that this product is powdery, so either make sure you have a moisturizer on underneath, or blend well.

For the powder itself I broke down it's performance into four sections: the ability to blur pores, glow, colour-correcting ability, and longevity on my face.

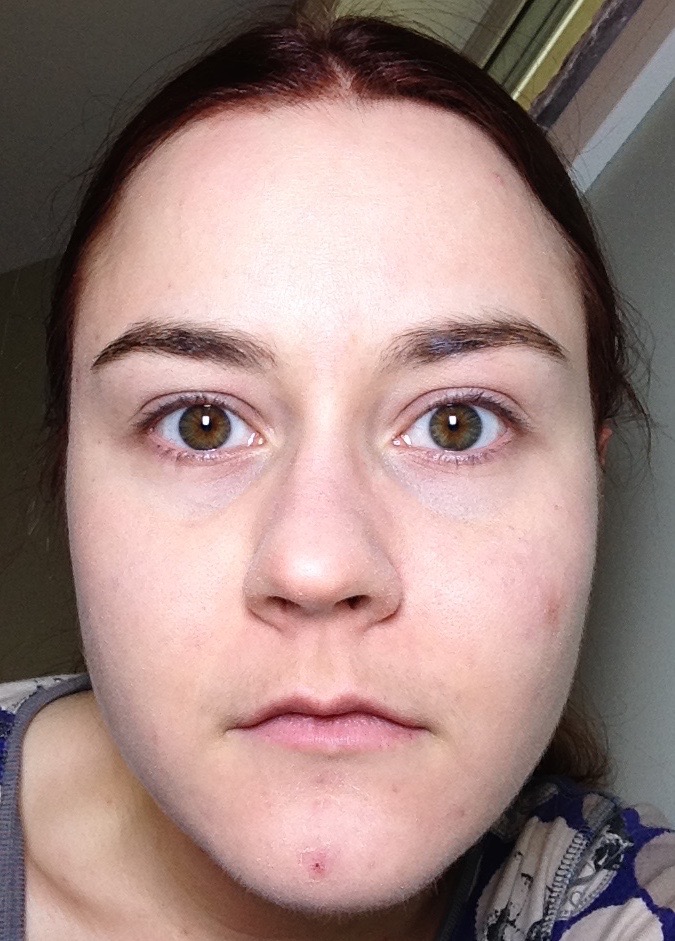
First however here is the powder applied on my face where the only other makeup is a tiny bit of concealer on my under-eye circles as this isn't supposed to have an effect on them. I even left my acne and acne-scarring uncovered except for the hourglass powder so that you could really see any coverage.
Left is bare, Right is covered with Diffused light.
As you can see there is a slight difference when comparing the two sides, but it is subtle. It's not something you're going to be able to pick up really unless your looking for it. 

For it's ability to blur pores and fine lines I think is the weakest point for this powder. It does blur them the tiniest amount but not enough that if someone were talking to you they would be able to truly see a difference. As this was what I was hoping would be it's biggest strength I disappointed in this aspect.

I do think this product has fairly good colour-correcting abilities however, especially for a mostly translucent powder. If you look around the base of my nose you can see the redness I get on the left where it's much reduced on the right. Not perfect for acne by any means but for basic redness I do think it's decent.

As for glow this is another subtle one. I do like the subtle glow that this gives, and there definetly isn't a glitter problem which I know some people complained about, at least not with this shade. It does have a subtle brightening effect for the whole face, like you drank that water you were supposed to.

However the real kicker for me has to be the longevity of this powder. I'm still playing around with it but this stuff seems to disappear within about an hour for me. Yes, an hour. Granted this is with my combination-oily skin, but as I usually layer a foundation underneath this and concealer, I expect it to last at least three hours. It honestly just seems to disappear, it is very frustrating. 

I'm actually kind of broken-up about this powder. I want to love it. It was a gift from a loved one and the packaging is gorgeous. I like that it colour-corrects and adds a subtle glow. The fine-milled powder makes me feel decadent and special when I apply it with the puff. But it just doesn't hold up and the effect is so subtle I feel let down. Especially as you can't travel with it anywhere due to it's fragile nature, plus the price is so high. Overall I might have to return this.

Sprite Rating: 5/10
It lost two points for longevity, and a point each for minimal blur, fragility, and price (which I wouldn't have minded paying if the product lived up to it's claims).

Disclaimer: I received this product as a gift from a family member.