1. First you're going to need a good polish remover. I love the ones that have a sponge with slots in it to put your fingers inside. It seems weird but the polish is so much easier to remove. Especially glitter polishes. After I remove my polish remnants I like to quickly wash my hands as I find polish remover to be very drying if you leave it on for any length of time.
3. After shaping my nails (approximately the same from nail to nail- something I struggle with at times), if my cuticles are in really bad shape I like to use the Revlon Gentle Cuticle Remover. At first I was a bit leery of this product- a topical product to remove my cuticles? This is either not going to work at ALL or it's going to sting like crazy! However, this product is great. It doesn't remove your main cuticle what it does is loosen the very thin base cuticle that grows onto your nail. This also helps loosen you main cuticle enough so that you can more easily push it back. I generously gloop this on with the polish wand and then apply a second layer a minute or so later. Then I take one of my reusable cuticle sticks and gently using the bevelled edge push back my cuticles.
4. After washing my hands again I usually moisturize my hands with focus on my cuticles. This the Body Shop Strawberry Puree Body Lotion is very light and non-greasy. It sinks in fast too (though it could do with some more moisturization properties). Usually I use whatever moisturizer I happen to have on hand, and this one was the closest!
5. Now, finally I start the painting part. First is one to two coats (depending on the condition of my nails) of Nail Tek II Intensive Therapy. I use this as a base coat as it does wonders for strengthening my nails.
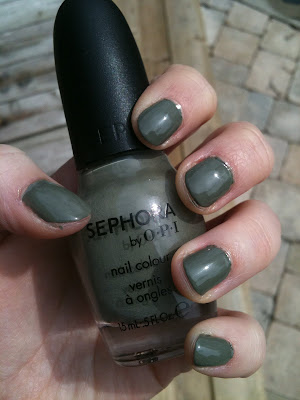
6. Colour! Here is Sephora OPI's Caught with my Khaki's Down, and I've used two coats for this manicure. Of course this varies from polish to polish :D. The best way to apply I find is from the bottom of the nail to the top in as wide a stroke as you feel in control of. The less strokes per coat the better, as you'll have less streaks and imperfections. Keep in mind, practice makes perfect!
7. Lastly, because I can't wait patiently to save myself and because I'm guarenteed to destroy my manicure if I don't- Quick Dry Top Coat. I love China Glaze's Fast Forward as it is really really fast and it makes the polish very shiny. Also, I adore this top coat for the fact that it levels and hides small imperfections from my colour coats. To wrap up the manicure it's a good idea to take your top coat along the tips of your nails- both on top and beneath your nail. This will seal the edge of your nail and make your manicure last longer.
Finally the finished product! I am loving this colour- perfect sage green, sometimes green and sometimes grey. Adore!
 |
| New sheets and it matches perfectly! |


im using ChG's fast forward top coat too! i prefer it over SV since i think chg dried faster than my sv cause when i wore my ballet flats, my right side(which was applied with SV), did not dry on time and I got some nail polish stuck in my ballet flats T____T
ReplyDeleteHi Hebridean Sprite: I can't believe you mentioned my name, LOL in this post, I am so surprised and shocked, LOL But thank you for doing this. Your nails look gorgoeus and love the Grey color of the Sephora by OPI, Caught with the Khaki's Down," looks sensational the step-by-step sequence of your procedure and all the tools you use. Fabulous! You just made my Sunday, LOL Amazing!
ReplyDeleteI really Love this web blog and subscribe by email! Have a glorious day!
Love,
Mc Huggs :)
Hi:
ReplyDeleteFYI-I posted your web blog both on my Face Book profile page here: http://www.facebook.com//McHuggs#!/McHuggs as well as my twitter page here: http://twitter.com/#!/floating_man
My main face book account link is: http://www.facebook.com/McHuggs